Off-road Jeep Trailer Build
Trailer Constructed 2006-07, DP Dusenbury
©2007 David P. Dusenbury
(click on thumbnails to expand to 800x600, right click to open in new window or tab)
I was wanting a trailer to pull behind my CJ5 for camping and stuff, especially since I am converting to propane, and will lose much of my already limited cargo capacity from the two forklift 'pane tanks in the cargo area. In addition to trail camping, the trailer will also be used around town and for short road trips.
Basic design criteria was:
- Same track width as my narrowtrack CJ5
- Same tire size as CJ (33x12.50R15)
- Strong enough to stand up to off-road use
- Large enough for camping supplies, food, water, tools, etc for two people for a long weekend
- Weathertight
- Secure, lockable storage
- Bear proof (black bear) and mouse (mini-bear) proof (as much as can be)
- Lights to be as foolproof and failsafe as possible (LED's, siliconed and epoxied)
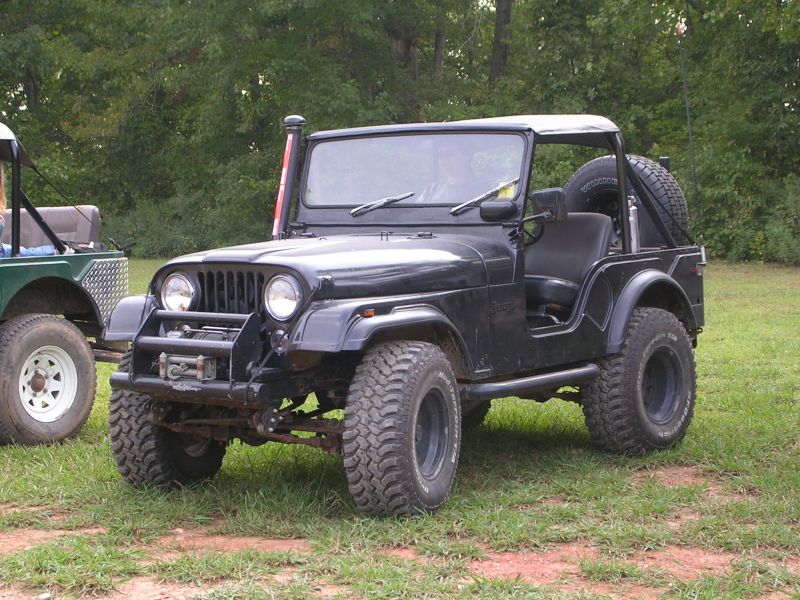
First off, this is the tow vehicle, a 1973 Jeep CJ5:
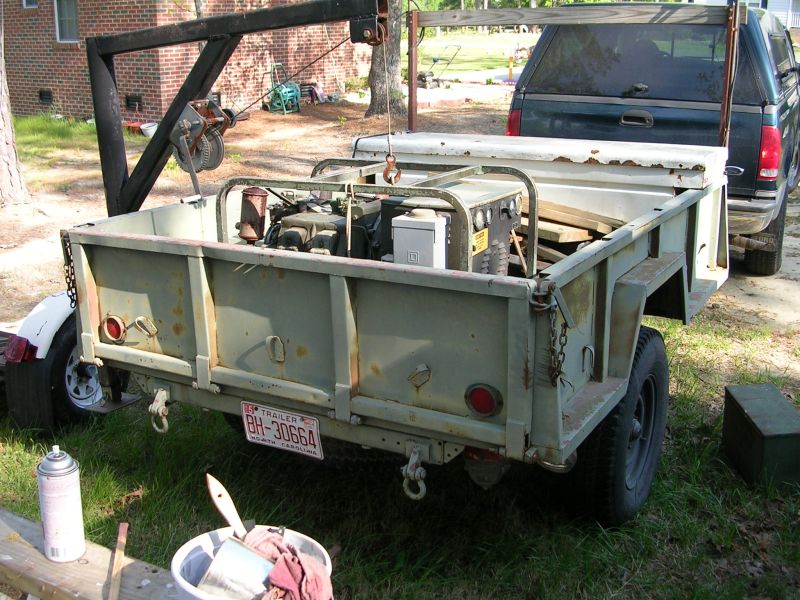
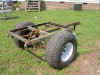
I had a military 3/4 ton trailer, an M101A2, that I had up for sale, and had no buyers for, so I figured that would be a good start on an offroad trailer for the little Jeep. At one time, I had a hoist/crane mounted to this trailer (since moved to a new M101 frame), and it had severely bent the frame where it was attached and the surge brake system was shot, so I really didn't mind cutting up an otherwise good trailer. The next picture is the M101A2 that I cut up. (You can see that the hoist is woppa-jawed from where the trailer frame is bent.)
Notes on budget and materials:
I started this project sort of because I wanted an offroad trailer, and partially because I had a pile of parts accumulated that needed to be assembled into something useful. This project was very affordable because of the amount of junk I have accumulated around the shop. The donor trailer, plenty of scrap steel, heavy strap hinges for the tailgate and lid, and many other items were salvaged from my junk pile/scrap bin. Wheels were cheap, and tires were take-offs from my CJ. If I had set out to do all this with no materials at all, it would have cost several hundred dollars more. So far I've spent about $120 on steel, and still need to buy a sheet of 16ga. Total cost out of pocket of the project when finished will be about $425. Considering the value of other items I've put into it (such as the cost of an M101A2 frame and axle, miscellanous parts, and the take-off tires), it would probably take $1000 to build it straight out. Labor would easily add at least another thousand to fifteen hundred to that if you were to hire it out.
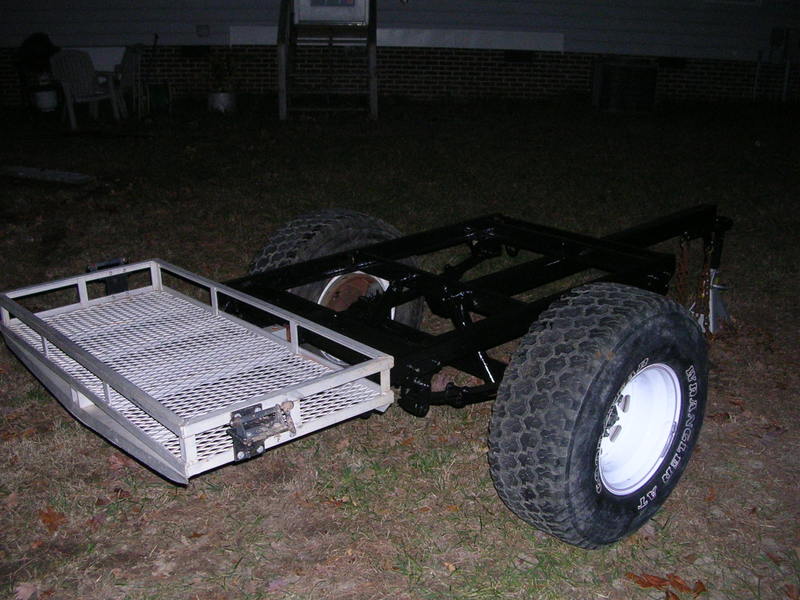
Frame and axle mods:
Stock, the M101A2 trailer is about 8' long and 6.5' wide. I wanted it to match the track width of my narrowtrack 1973 CJ5, and I had to take about 12" out of the axle width to accomplish that. Working backwards from the WMS to WMS (Wheel Mounting Surface) dimension that I needed, and using wheels with the same offset as my CJ5, I figured that a 36" wide bed would be about right, so I removed 9" from the width of the original frame, and also moved the spring perches to match the frame width.
I wanted to use the stock springs and leave the stock spring hangers in place, so I cut the frame rails about 2" in front of and behind the front and rear spring hangers, giving me a frame length of 54". The axle mounts 2" off-center on the springs, so the axle is 2" behind the centerline of the cargo box. With that small difference in balance, plus the full-size spare that will mount on the front edge of the bed, I will have adequate tongue weight for safe handling, even when the cargo box is empty, and the bike rack on the back.
I removed the surge brake hardware, including the backing plates and brake shoes, but had to leave the brake drums on, as the lug studs were not threaded all the way down and I needed the drums to act as a spacer. For the tongue, I used a piece of 3x3x1/8 square tube left over from another project; it is welded to 3 of the trailer crossmembers, and I welded the original M101 pintle hitch on the front end, with brake master cylinder and landing gear removed. Both ends of the tongue are capped.
I removed two leafs from the trailer's spring packs to level the trailer to the same frame height as my CJ, and to soften up the ride a bit. The 3/4 ton rating of the M101A2 is an off-road rating, and cargo capacity on-highway is about 3000lbs. I expect this trailer to weight approx 750 pounds when complete, plus up to 400 pounds of tools, camping gear, water, and spare forklift tanks, so there is no issue with capacity after altering the spring pack. Also, 1150 pounds total will not be an issue when offroading, because worse case, I'd just drag the trailer in a couple of miles over relatively easy trails to where camp would be established.
Wheels are 15x10" 8-lug that I purchased used off a local 4x4 board (nc4x4.com) for $100. One day, it may be nice to either convert the CJ to 8 lug, or the trailer to 5 on 5.5, so the spares would be interchangeable, but this is a budget build, afterall. Tires are G/Y Wrangler Radials, 33x12.50's removed from my CJ5. I had gone to the local tire shop to ask about cheap/used 33's, and he happened to be sitting on a set of BFG mud-terrains in the same size that someone had ordered and paid a deposit on, but never picked up, so he made me one heck of deal. I was looking to replace my CJ tires anyway for a more aggressive tread pattern. I had to pay $40 to get the old tires mounted on my "new" trailer rims.
So $140 into the project, and this is what I have so far:
I added a 2" receiver hitch to the rear crossmember, and welded in a 1x2x14ga secondary crossmember to reinforce the hitch. This is mainly for attaching my hitch-mount carrier to the trailer, which I used to haul my mountain bikes on. You can see one of the the fork-tube bike mounts bolted to the aluminum rack in the next photo. The frame has been pressure washed, wirebrushed, and painted with POR-15 paint (www.por15.com). I'll topcoat the exposed portions of the frame when I paint the body.
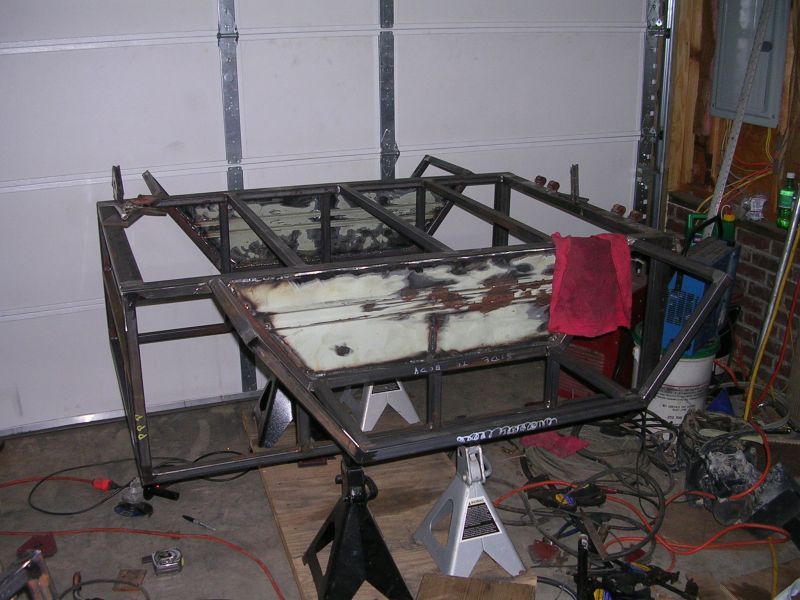
Fabricating the body:
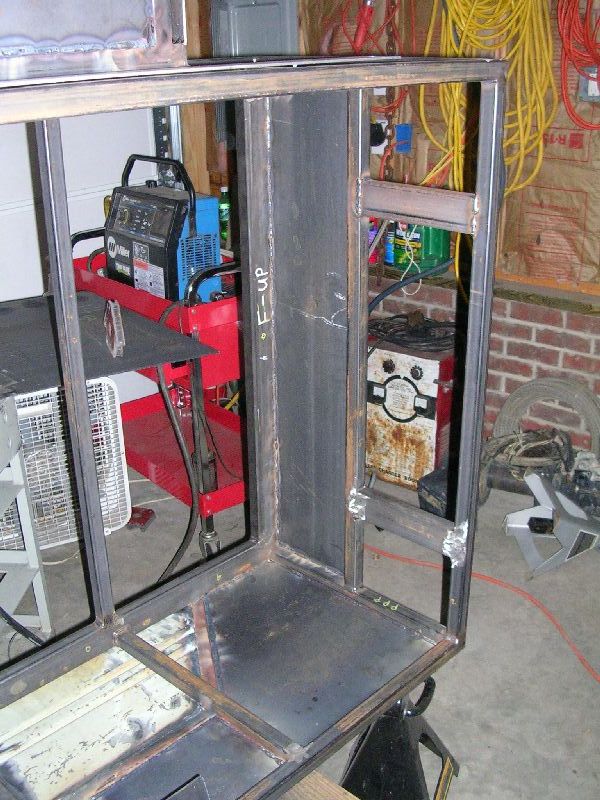
The frame mostly done, I moved on to building the body for the trailer. Originally, I planned on making it 36" wide, 54" long, and 24" tall. After mocking up my first side, realized that it was going to look to "cubular" (that should be a real word) and decided to make the sides 18" tall so the proportions would be better. Fenders are attached to the body, simple 3 panel flat fenders, 15" wide.
The body frame is mostly 1x1 14ga steel tube, with some 11ga 1x2 thrown in here and there (outer perimeter of floor where it bolts to trailer chassis, uprights at tailgate opening, and support blocks for tailgate and lid hinges. The floor and fenders will be some leftover 12ga sheet I have, and I'll use 16ga for the sides and lid.
All the sheet metal panels are cut to fit into the openings between the square tube, then the welds are ground down flat. This is more work, but there are no overlapping panels, which would trap water and lead to rust problems on down the road. The welding is slow going, using 1-in-6 to keep from overheating. (After tacking in, weld one inch out of every six inches, then come back around, and weld an inch in between existing welds, then another pass, and again, until it is welded continuous all the way around the panel. Go slow and give it plenty of time to cool, fitting and welding several panels at once to avoid building up heat and warping the frame.)
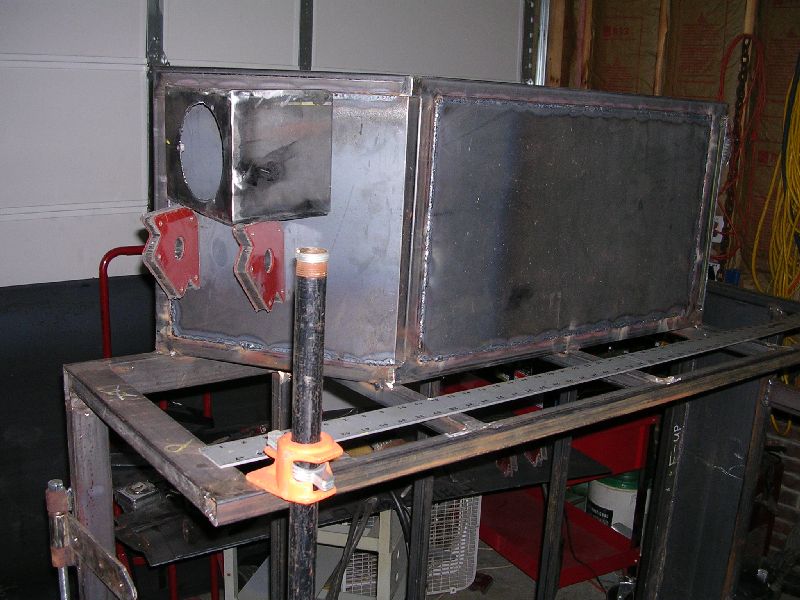
It's upside down in the following pic. As seen here, it maybe weighs 100# or so. It's getting heavier as I add the approx 56 sq. ft of sheet metal (2.5500lbs per sq ft for 16ga, 4.4625lb/sqft for 12ga). The sheet metal will weigh about 200 lbs total. The bare frame is light enough for one person to move about, flip over, etc. In the picture, you can see 4 jackstands supporting it. They are resting on a 2'x4' plywood dolly that has swivel casters, so it's easy to turn it around rather than having to chase around it with the welder, and also can position it when grinding welds down so that most of the dust/sparks/etc goes out the bay door of the shop.
Lights and wiring:
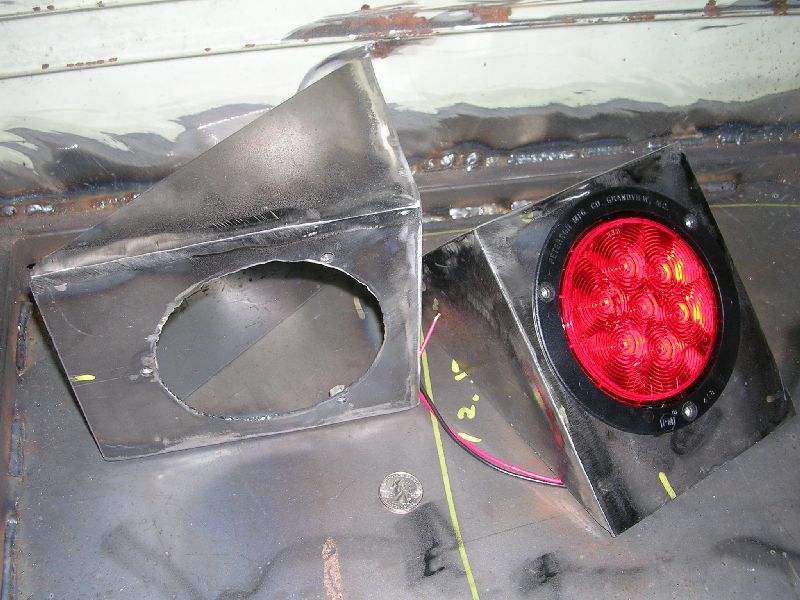
I took a break from welding in panels to make make my taillight housings. I wanted to use the same Peterson "Piranha" LED taillights that I have on my CJ5, so I made boxes that will be welded to the back of the fenders to house the 4" LED lamps. They measure 7" tall, 5.25" deep at the top, and 6" wide. They will mount on my 15" wide fenders, up 1" from the bottom and in 1" from the outside edge. The big hole for the light is 4.5". It took about 2 hours to cut them out (plasma), weld up, and grind down the welds (using flap disk in a side grinder). Side marker lights are also LED, and are the same as installed on the CJ.
The lights came from Northern Tool, each one was $30, plus the side markers were $8 each (2 amber, 2 red).
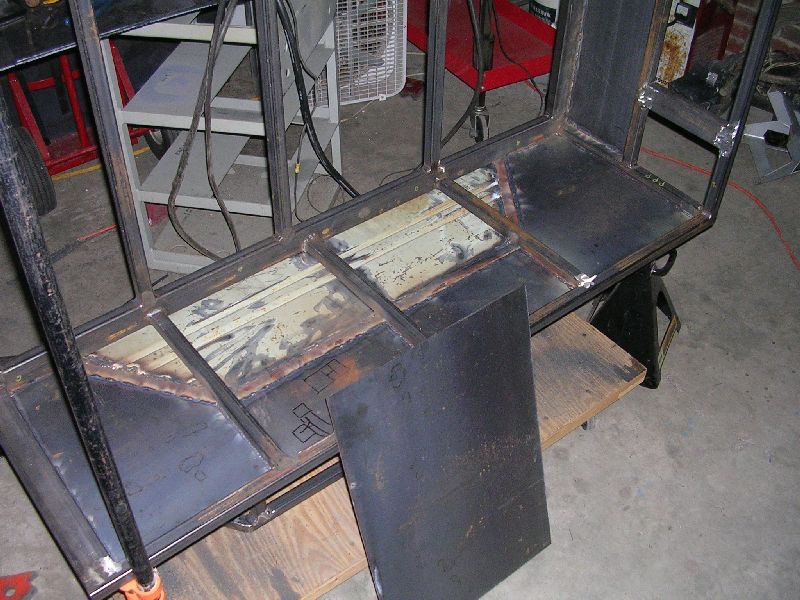
Back to building the body. The panels are cut to fit flush in the spaces between the square tube, tacked, then welded. This is the back side (inside) after flipping it over. It's still light enough to easily flip when needed.
Looking at the first panel in the front end of the trailer box:
This is the left hand fender, with welding magnets holding one of my light buckets in place. That's probably the position I'm going with, although it does look pretty good also to center the light housing on that fender panel. You can see one of the strap hinges I'm using for the tailgate. It's let in to bottom of the 1x2 cross member.
Left to do at this point (February 2007):
Finish body panels
Build tailgate
Build lid
Build spare tire mount
Paint
Wire lights